
If you make use of Windows 11, you need to know how to clear cache. Most times, cache is needed to give you a faster and better user experience, but sometimes cache is needed to be removed. When you are having difficulty loading an updated or new webpage, you must clear your cache. Or, in times when you are low on storage space or RAM, you need to clear cache.
Clearing your cache gives Windows 11 better performance and stability. In times where caching frees up your RAM and storage space, your device gets better performance. If you are having a hard time using Windows 11 and you need to clear cache, there is no need to be bothered. There are very easy steps given to guide you when clearing cache. As you read on, these steps will be given.
What is Cache?
A cache is a diversified, expeditious software or hardware component that keeps regularly requested instructions and data. These data and instructions are then turned and used for faster loading of apps, websites, services, and other things on your system. It makes data that is mostly recently used available at any time. Cache files are made from different types of cache memory. Also, cache files make reference to continuously needed files such as logos, icons, shedders, and other files needed in multiple programs.
Why Should I Clear Cache on Windows 11?
As previously stated, clearing your cache gives your system better performance and also helps you create space. However, there are other reasons why you should clear your cache. These reasons are stated and explained below.
Clear Storage Space
Yes, we all know that cache takes up a little space on your system. But did you know that cache can pile up and fill up a large space? When these cache files pile up and fill up a larger space on your Windows 11, you may be in need of these spaces. After a certain period of time, it is necessary for you to clear them and get your storage space back.
Outdated information
Cache saves all instructions and data for all the things you do on your Windows 11, both old and new. Most of the time, you must clear old cache from your window.These old cache files sometimes prevent you from accessing new versions of websites or apps on your system. Just by clearing these cache files, you can fix that problem.
Caches can be corrupted
In a case whereby an app on your system is misbehaving or crashes, there is a corrupted cache file on your system. In this case, you need to clear all corrupted cache files on your system before using it. When that is completed, you will be able to use your system with ease.
Performance
As your cache files grow, the performance of your system gets better. But if these cache files pile up more than they should, it affects the performance of your system. Once this happens, your system’s performance gets very slow. However, to fix that, you need to clear your cache.
How to Clear Cache in Windows 11
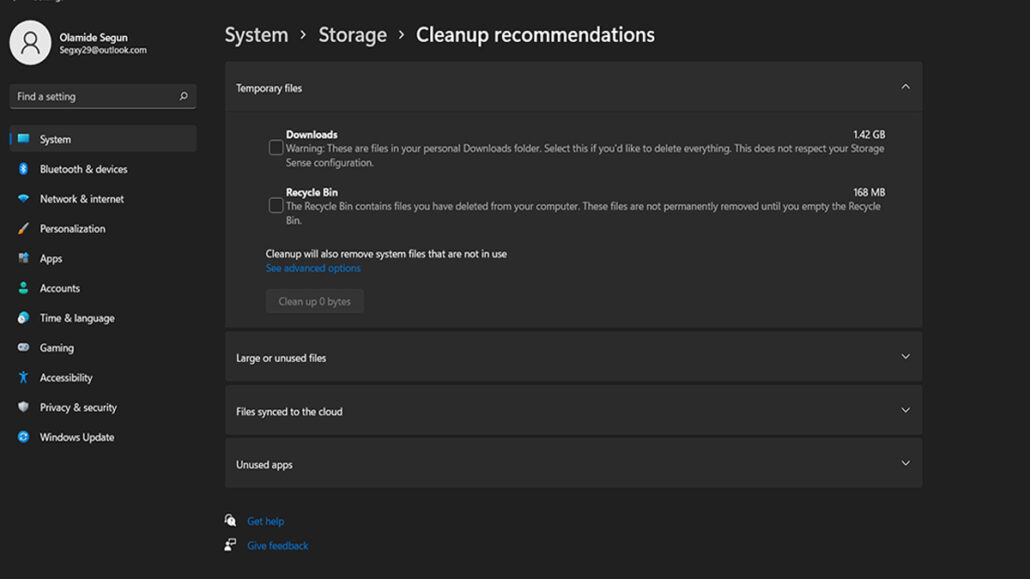
Going to Settings is one way to clear cache from your Windows 11 computer. This step has been made very easy to follow up on. Right from your storage, you can access all your cache files. Through the below steps, you can clear your Windows 11 cache files.
- From your Windows 11 computer, visit settings.
- Select System on the new page.
- After that, locate and select storage.
- Click on ”Temporary Files.”
- Tap on the box next to every file you wish to remove.
- Select Remove Files.
- Lastly, click on “continue”
Once completed, you have officially cleared all of Windows 11’s cache. Now that you know this, you can follow up on it whenever it is needed.
How to Delete the Windows 11 Location Cache
Another type of cache you need to know how to clear is the location cache. This type of cache keeps track of your physical location. In a case where your apps are not picking up your correct location, you may want to clear this cache.
Also, in a case where you do not want your apps to pick up your correct location, you can clear this cache. However, to clear this cache, you need to follow the steps below.
- Navigate to the Settings menu in Windows 11.
- Select ”privacy.”
- Now click on ”security.”
- Find and click on ”location.”
- Next, click on “Clear” on the location history.
Now that this has been done, you will have no issues with clearing your location cache. However, all that is required for this step is for you to follow the steps correctly.
How to Clear Microsoft Store Cache in Windows 11
Every piece of data and instruction from your Microsoft Store gets stored in your Microsoft cache. This cache helps your Microsoft app load faster. But in a case where you are having difficulties with your Microsoft Store, it is time for you to clear your cache. To fix this issue, you need to follow the below steps.
- From your system, press Windows+R.
- Then type in wsreset.exe and tap OK.
- On the “black box” page that pops up, your cache will automatically clear.
- Once it is done, your Microsoft Store will show a clear cache in the form of a white window. Then the app begins to rebuild its cache.
Just ensure that these steps are followed correctly to avoid doing the wrong thing. As long as this is done, you can make use of your Microsoft Store easily.
Is Clearing cache in Windows 11 safe?
Clearing cache on Windows 11 is extremely safe. If you are bothered by your apps and websites, after clearing your cache, these apps and websites will recreate a new cache on your system. However, cache stores files that are not actually needed on your system, and deleting them does not affect anything in your system. Instead, it will create a faster and easier way to access these apps.